Sunday, 28 August 2011

Family Snapshots

Fragments strike fear into my heart, and it's because I always get into a mess with them. Too much glue, air bubbles, cat fluff caught between the fragment and the image (one of the joys of having two very helpful and artistic ragdoll cats who think fluff is the perfect embellishment for every occasion), so, with said cats banished from the room it's time to have another go.  Grungy Monday Challenge Number 21 over at  Studio L3 is all about fragments this week.  And as directed by the lovely Linda I have paid a visit to Mr Holtz's blog and his fab ideas for using Fragments which can be found there.
Here is my family tree, ( thank goodness they are not really my relatives because  Great Grandma and Auntie Joan in particular look rather scary).


I 've used a Wendy Vecchi Art Part frame which is covered with some Shabby Chic paper and inked with Antique Linen DI plus some splats in Antique Linen and Weathered Wood Distress Stains (they are such fun to do), the tree is by Wendy Vecchi and stamped in Coffee Archival Ink.  The outer frame is sanded and inked around the edges with Vintage Photo DI.  


I only had a few Fragments left , so thought I'd better avoid the etching technique until I've got more to play with as I know that I would probably melt quite a few before I got it right, so I used Alcohol Inks on Great Grandma, and somehow these are not quite right, but my technique was better by the time I got to the Family Tree fragment at the bottom of the frame.

Elsie is a packing tape transparency, how cool is that technique, I love it, it's like magic when the paper rubs away to reveal the image, her name and a little bit of spotty paper are sandwiched between the transparency and some sticky back canvas. 

The words are computer generated using an old typewriter font, and all the vintage images that I've used are from Tumblefish Studios, and,  just in case any of my family see this, none of you are quite as scary as Auntie Joan!

Monday, 15 August 2011

In a Mauve Mood

It's been over two weeks since my last post,and I don't even have the excuse that I've been on holiday, but my mojo has definitely been awol.  So today I've pulled myself together and made a tag, and as luck would have it it fits in with the themes for several challenges, Simon Says Show Some Bling,  Grungy Monday 20 (Distress Stickles Party) celebrating all things Tim Holtz, and this weeks Sunday Stamper Challenge which must include something white.

My tag is covered with some Shabby Chic Paper and lightly inked around the edges with Dusty Concorde DI, and then using some white acrylic paint the tag is stamped with the words from the Papillon set of stamps by Tim Holtz.  The diecut dressform is card and sticky backed canvas inked with Dusty Concorde and  Walnut Stain, and again I used some acrylic paint for the stamp on the canvas (I did go over this a bit with a white pen as the paint seemed to disappear into the canvas).  And then, although you can't really see it very well I used lashings of Rock Candy Distress Stickles on the dressform.
For the bling bit of this tag I've threaded a large 'diamond' onto the ribbon around the dressform neck, and also stuck two sparkley pins into the ruffles.
The braid at the bottom of the tag is from my bag of bits, and I've dyed some seam binding with Dusty Concorde for my ribbon.

Friday, 29 July 2011

Let's Fly Away...

Let's fly down to Brazil....
If only.
Over at Studio L3 this weeks Grungy Monday challenge is to Rock using Rock Candy Stickles or Distress Crackle Paint. For full details  go and have a look and also see Tims video here.
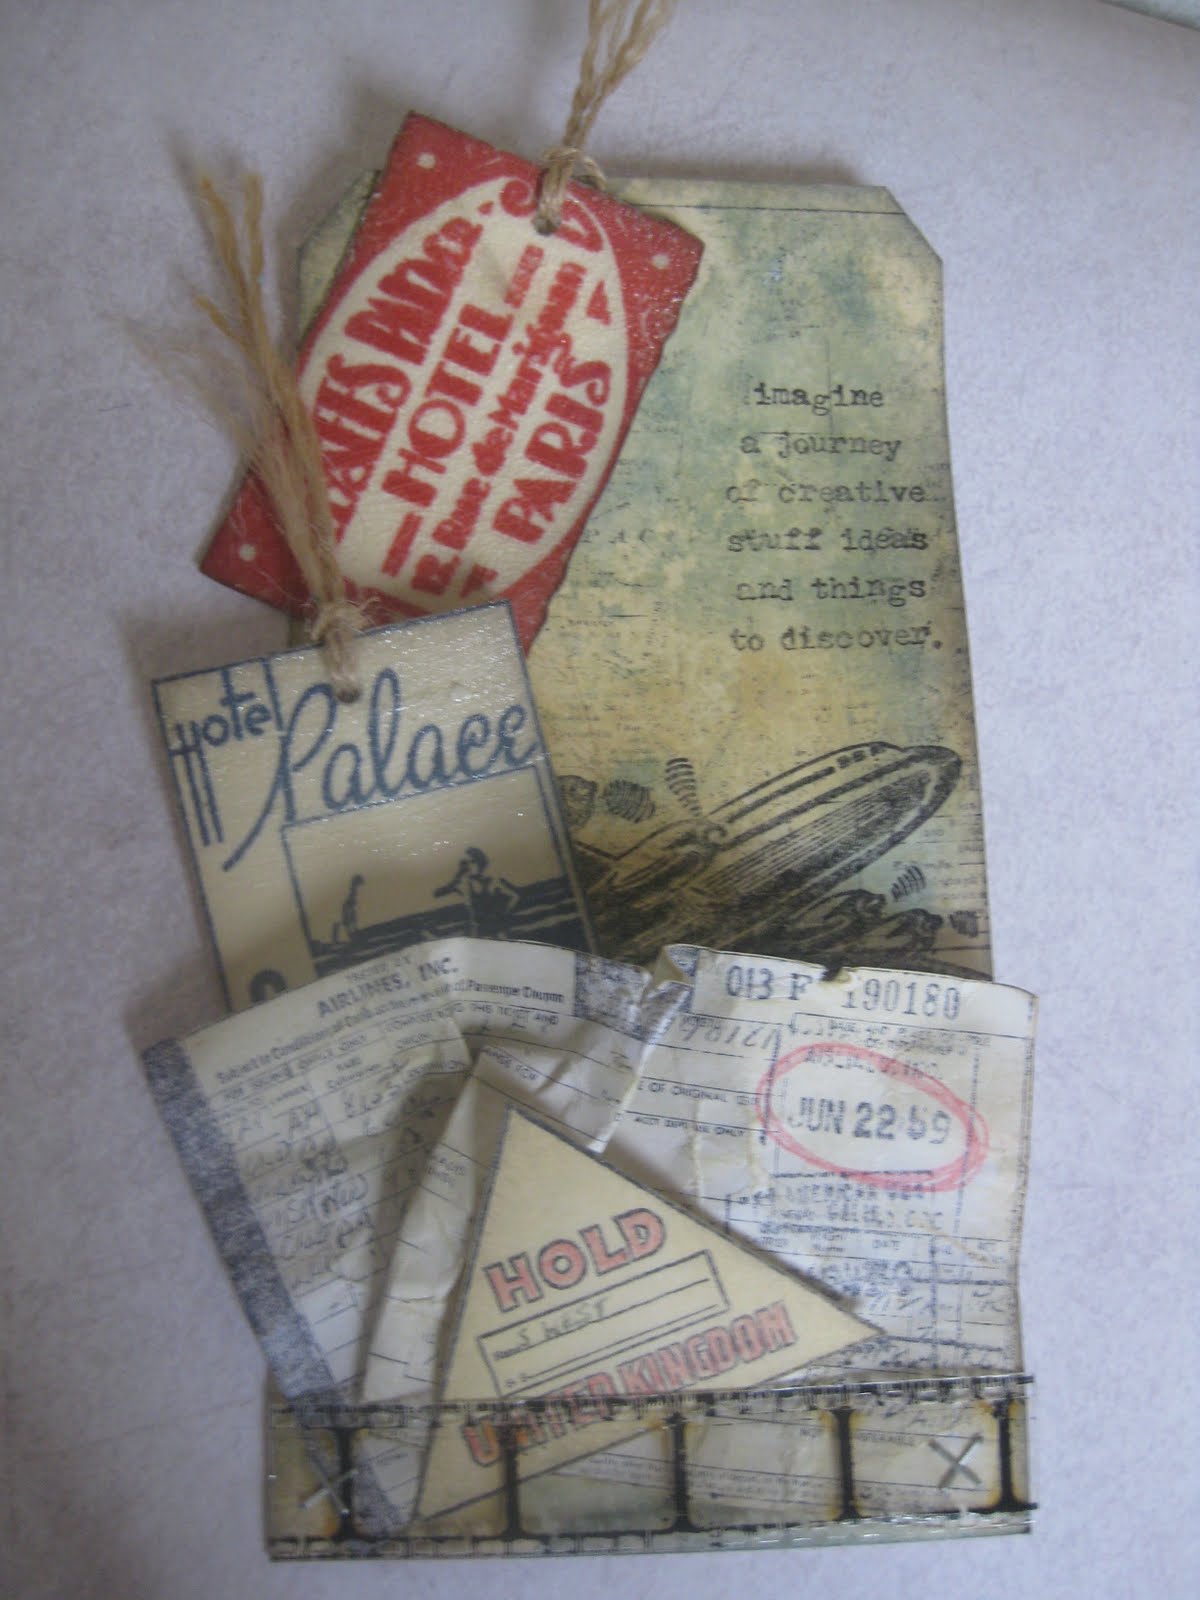
Having been given the Tim Air Travel stamps for my birthday, I felt I really needed to get them out of the packet, so here is a tag which uses them and the Travel Labels as well.

Actually, I discovered something really cool about these stamps.
The airline ticket has my birthday on it, and although it will reveal that I'm well into middle age, it's not just the day but the year as well!!

I'm afraid I just cannot seem to get a very good picture of this tag, so apologies for the out of focus effect.
The tag is coloured with Weathered Wood and Antique Linen Distress Stains, and stamped very lightly with the map of the Pacific, and then with the plane using black Archival Ink.The tag has also got a light covering of Rock Candy Distress Stickles, but it just doesn't show up. The Airline ticket was stamped on some plain white paper, inked with Antique Linen DI and scrunched up then inked again so the creases look a bit darker, and I couldn't help it, I had to circle the date. It is attached to the tag along with some film strip using tiny staples.

The hotel labels have been stamped onto manilla card using Cobalt and Vermillion Archival Ink, and then painted over with Rock Candy Distress Crackle Paint, which I hadn't used for ages and was a bit dried up, but I managed to scoop enough out to just about paint the labels. Finally the sentiment is part of the long strip of words from Tim's Stuff to Say stamps.

I'm also entering this tag in Gingersnap Creations Challenge 111 Planes and Trains, and this weeks Simon Say Stamp and Show Anything Goes.

Sunday, 24 July 2011

No Lycra Allowed

You may never have asked youself what midwives do in their spare time, and in truth you probably don't want to know, but I'll let you into a secret, we do love to have fun, and it's so fabulous that where I work not only do we have a great work team, but we are all great friends as well.
At our little Birthing Centre we have started a very small and exclusive cycling club  (lycra shorts are banned), and although our stated intention is to get fit, actually the hidden agenda is that we always end up at a pub!  And these evening expeditions are always along the towpath of the Kennet and Avon canal, so its flat all the way. Well, we don't want to arrive for that refreshing drink all hot and bothered.
I was very pleased to recieve a comission from my fellow cycle club members to design a club badge, and after several prototypes here is the finished design.


I've got 10 little shrink plastic bicycles now waiting to be stuck to the badges.  Both stamps I've used are by Tim Holtz, and I've used Jet Black Archival Ink and Vintage Photo Distress Ink.  The ticket is just mounted on some stiff black card, and I've been busy with the silicone glue sticking pins to the backs of the badges.  Here is a little pile of finished ones.


I am entering my badges in the Gingersnap Challenge, On the Road, and also this weeks Sunday Stamper where the theme is Black.

Thursday, 21 July 2011

It's a Cat's Life

It's been such a wet and gloomy afternoon here in Wiltshire that I thought I'd play with some nice cheerful colours, and I have made an ATC which sums up the cat life style I think my two kitties enjoy.
(Well, I hope this is how they feel!)


I've splooshed Barn Foor, Wild Honey and Spiced Marmalade Distress Inks onto watercolour paper, and used some 7 Gypsies Lille stamps with Vermillion Archival Ink, plus various bits of German Scrap as embellishment.  My Kitty's eyes and nose are made with Enamel Accents from Ranger.

The challenge theme over at The Artistic Stamper this month is Hot Hot Hot, and as these colours fit the bill, this is my entry.

If you would like this ATC just leave a comment, and I'll get my Kitties to randomly pick someone in a couple of weeks.

Tuesday, 19 July 2011

This Could Be Useful

It's time for a Grungeboard Extravaganza over at Grungy Monday, the brilliant weekly challenge hosted by Linda at Studio L3 and featuring all sorts of fantastic Tim Holtz techniques and ideas.   The design team inspirations are fabulous, and if you haven't already, pop along to see Linda' lovely book and the gorgeous artwork from Brenda and Dawn.
I think it's a first for me this week in that I can't ever remember making something useful before.  Inspired by my Tim Holtz Haberdashery stamps I have made a needle book, so now I'll have no excuse for not sewing on buttons etc, because I should be able to find a needle.


I haven't used Grunge paper for ages, and had quite forgotten that really weird smell it seems to have.  Anyway, my grunge paper ends have been cut with the Scallops Alterations die, and then I have painted one side with Paperartsy Fresco Finish, Baltic Blue, and the other with Ice Blue. This paint gives a fabulous soft chalky finish that I just love.  The edges are coloured with a little Vintage Photo Distress Ink.


Some ric rac is just adding a bit of decoration inside the back cover.  The pages are made from from some scraps of natural linen, as is the cover, which I have stamped with Coffee Archival Ink, and then stitched to some paper. I have added three buttons as an embellishment, and then after sewing my book together, have glued this to the front cover.  I have stamped the pages with various sewing motifs. but they don't seem to show up very well in photos.
Now I'm going on a needle hunt to fill up my new needle book.

Tuesday, 12 July 2011

A Bit Rusty

It's already Grungy Monday Number 15, and I am still hopelessly behind, but thought I'd just dive right in with this weeks challenge, full details of which may be found over at the lovely Linda's blog Studio L3.  Here you can see fabulous examples made by Linda and the two Guest Designers for this week, Barbara and Rinda.
The technique this week is from one of Tim's 12 Tags of Christmas 2007, and full instructions can be found over at his blog
It's all about making a rusty effect this week.
I am one of those people who don't read instructions right through to the end before I start something (anything from Ikea always has not enough of something, or stuff left over at the end when I think my new bookshelf is done only to find it's actually the thing that holds it all together that I still have left).  I truly wish I had read the instructions to the end, because I had a lot of embossing powder flying around in a very messy way as I made my tag.
The tag is coloured with Wild Honey and Vintage Photo DI's, and I've used a Tim Holtz stamp for the words and the delivery van is a Wendy Vecchi stamp.
Now I need to have another go at cleaning up the dreaded embossing powder, because although I thought it was all gone it seems to keep appearing all over my desk as if by magic.